


 1.svg)

 Home
Home Home cleaning
 1.svg) Business cleaning
Business cleaning Blog
Blog About us
 1.svg) Contact
Contact.svg) Bookings
Bookings Cleaning address
 Requisites (for business)
 1.svg) Contact details
Contact details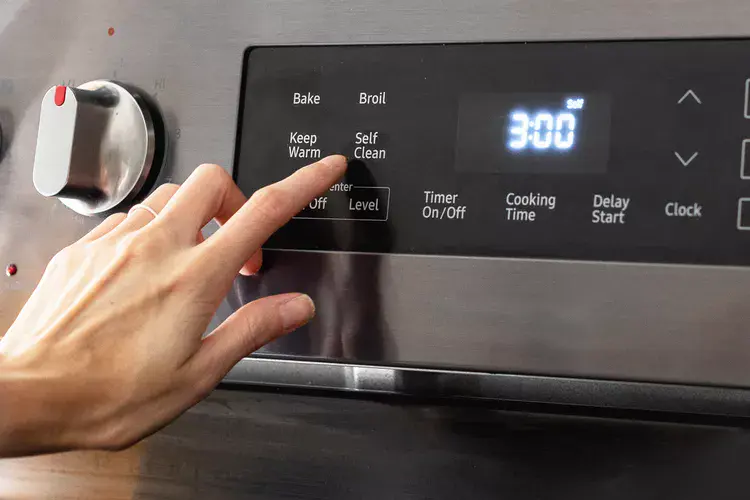
One of the most dreaded chores in the kitchen is cleaning the oven, especially an oven that has been neglected after several boil-overs and spills. But, you’re in luck if you have an oven with a self-clean feature. Using the self-clean cycle is simple—all it takes is a small amount of prep time, some patience, and a quick final wipe-down.
How Often to Use the Self-Clean Oven Cycle
Typically, the recommendation for running the self-clean cycle is every six months, maximum. How often you need to use it depends on the frequency of oven use and your cooking and cleaning habits.
Before You Begin
Always consult your oven model’s use and care guide. If you have lost the operating manual, most are available online from the manufacturer. Self-clean cycles can last from one to five hours so plan to do the cleaning during times you will not need the oven. The oven door will lock. Do not attempt to stop the cycle once it has begun or open the door until the cycle is complete.
Because of the high temperature, the self-clean cycle produces smoke and fumes as it incinerates the soil in the oven. It is important to keep the kitchen well-ventilated during the process to help clear smoke and odors. Do not block the oven vents so air can move freely.
Clear the Oven
Be sure that there is nothing—cookie sheet, broiler pan, aluminum foil, temperature probe—left in the oven. Check the operating manual to be sure the racks are self-cleanable. Most racks, especially stainless teel racks, should be removed before using the self-clean feature.
Since the self-cleaning cycle exhausts through a vent on the stovetop, you should also remove anything on top, such as spice containers if you store them on the ledge above your stove and oven dials or trivets kept on the stovetop. If you hang towels or oven mitts from the oven door, remove those as well.
Wipe Down the Door Seal
Dip a lint-free microfiber cloth in warm water and wring until just damp. Wipe the inside edge of the oven door and around the door frame to remove any crumbs or soil that might prevent a good seal. Take care not to move or bend the gasket around the door.
Increase Ventilation in the Kitchen
To help remove excess heat and fumes, turn on the range hood to increase ventilation in the kitchen. Open windows and turn on overhead fans, if possible.
Lock the Door and Select the Cycle
Most oven doors will lock automatically when you select the self-clean cycle. If it does not, lock it manually. Select the self-clean cycle on the control panel and let it run.
Clean Away the Residue
The oven door will not unlock until the interior temperature has dropped to a safe level. When the cycle is complete, open the door and use a damp microfiber cloth to wipe away the ashy residue that remains on the sides and bottom of the oven.
Reassemble the Oven
Clean any oven racks that have been removed from the oven by washing them in hot, soapy water with a scrubbing sponge. Rinse, dry, and replace the racks. The oven is ready to use.
Clean the Oven Exterior
Now that the inside of your oven is clean, it’s a good time to clean the exterior of the door and the control panel. How you clean depends on the type of surface but most can be cleaned with a microfiber towel dipped in hot, soapy water. Wipe down the surfaces and then dry with a fresh towel.
Tips for Getting the Best Results From a Self-Clean Oven
- Wipe up spills as soon as the oven is cool enough to clean safely.
- Do not use any type of commercial oven cleaner at the same time as the self-clean cycle.
- Do not leave any bakeware, oven liners, or utensils in the oven during self-cleaning.
- Check your operating manual for instructions on how to clean the oven racks. Most should be removed during the self-clean cycle.
- Run the self-clean cycle before soil levels are heavy. It is nearly impossible for the self-cleaning feature to remove thick layers of burnt-on food in one process.
Book a professional service
Sometimes greasy build-up in ovens is simply too challenging to be removed. Moreover, a thorough oven cleaning can be time-consuming and not exactly a very pleasant job. Fortunately, Shining Services has professional range cooker cleaners that have all the necessary tools and skills to deal with any cleaning situation and bring your Rangemaster oven back to life. We offer a range of cleaning services, created specifically to eliminate bacteria, viruses, and carbon residue while improving the overall energy efficiency and performance of your appliances. If you are worried that you don’t have enough time to deal with deep oven cleaning, feel free to contact us and we will be happy to come to your rescue.
